A Comprehensive Guide to CMake: Downloading, Using, and Mastering the Build System
Related Articles: A Comprehensive Guide to CMake: Downloading, Using, and Mastering the Build System
Introduction
With enthusiasm, let’s navigate through the intriguing topic related to A Comprehensive Guide to CMake: Downloading, Using, and Mastering the Build System. Let’s weave interesting information and offer fresh perspectives to the readers.
Table of Content
- 1 Related Articles: A Comprehensive Guide to CMake: Downloading, Using, and Mastering the Build System
- 2 Introduction
- 3 A Comprehensive Guide to CMake: Downloading, Using, and Mastering the Build System
- 3.1 Understanding CMake’s Role in Software Development
- 3.2 The Benefits of Utilizing CMake
- 3.3 Downloading and Installing CMake
- 3.4 Using CMake: A Step-by-Step Guide
- 3.5 Frequently Asked Questions (FAQs)
- 3.6 Tips for Effective CMake Usage
- 3.7 Conclusion
- 4 Closure
A Comprehensive Guide to CMake: Downloading, Using, and Mastering the Build System
CMake, a powerful cross-platform build system, has become an indispensable tool for developers building complex software projects. Its ability to manage the build process across diverse platforms and environments simplifies development and promotes code portability. This comprehensive guide will delve into the intricacies of downloading, installing, and utilizing CMake, providing a thorough understanding of its functionalities and benefits.
Understanding CMake’s Role in Software Development
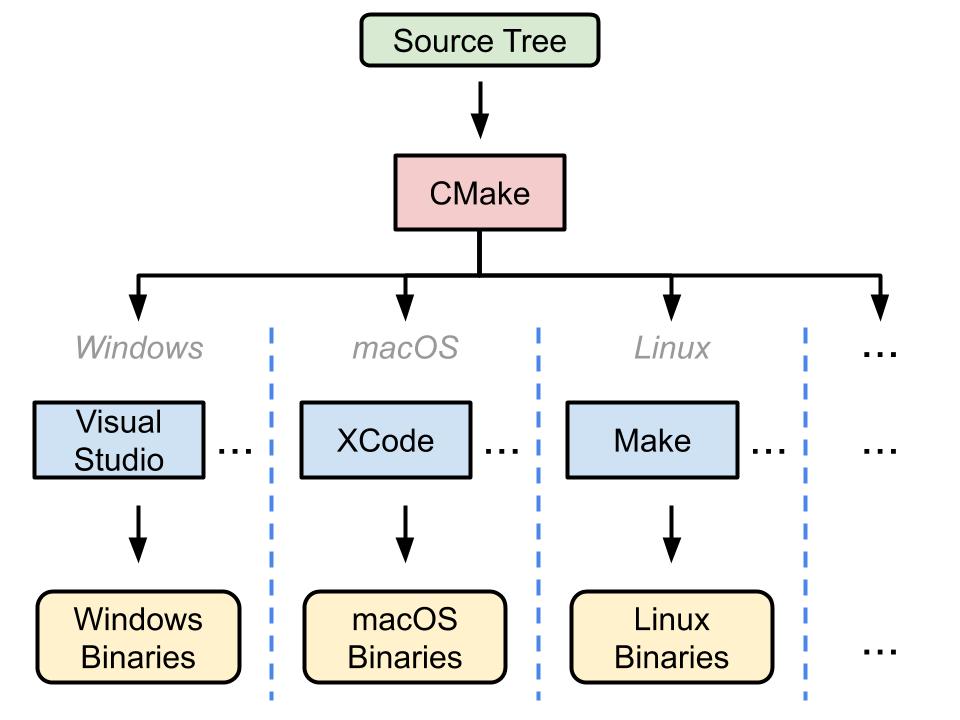
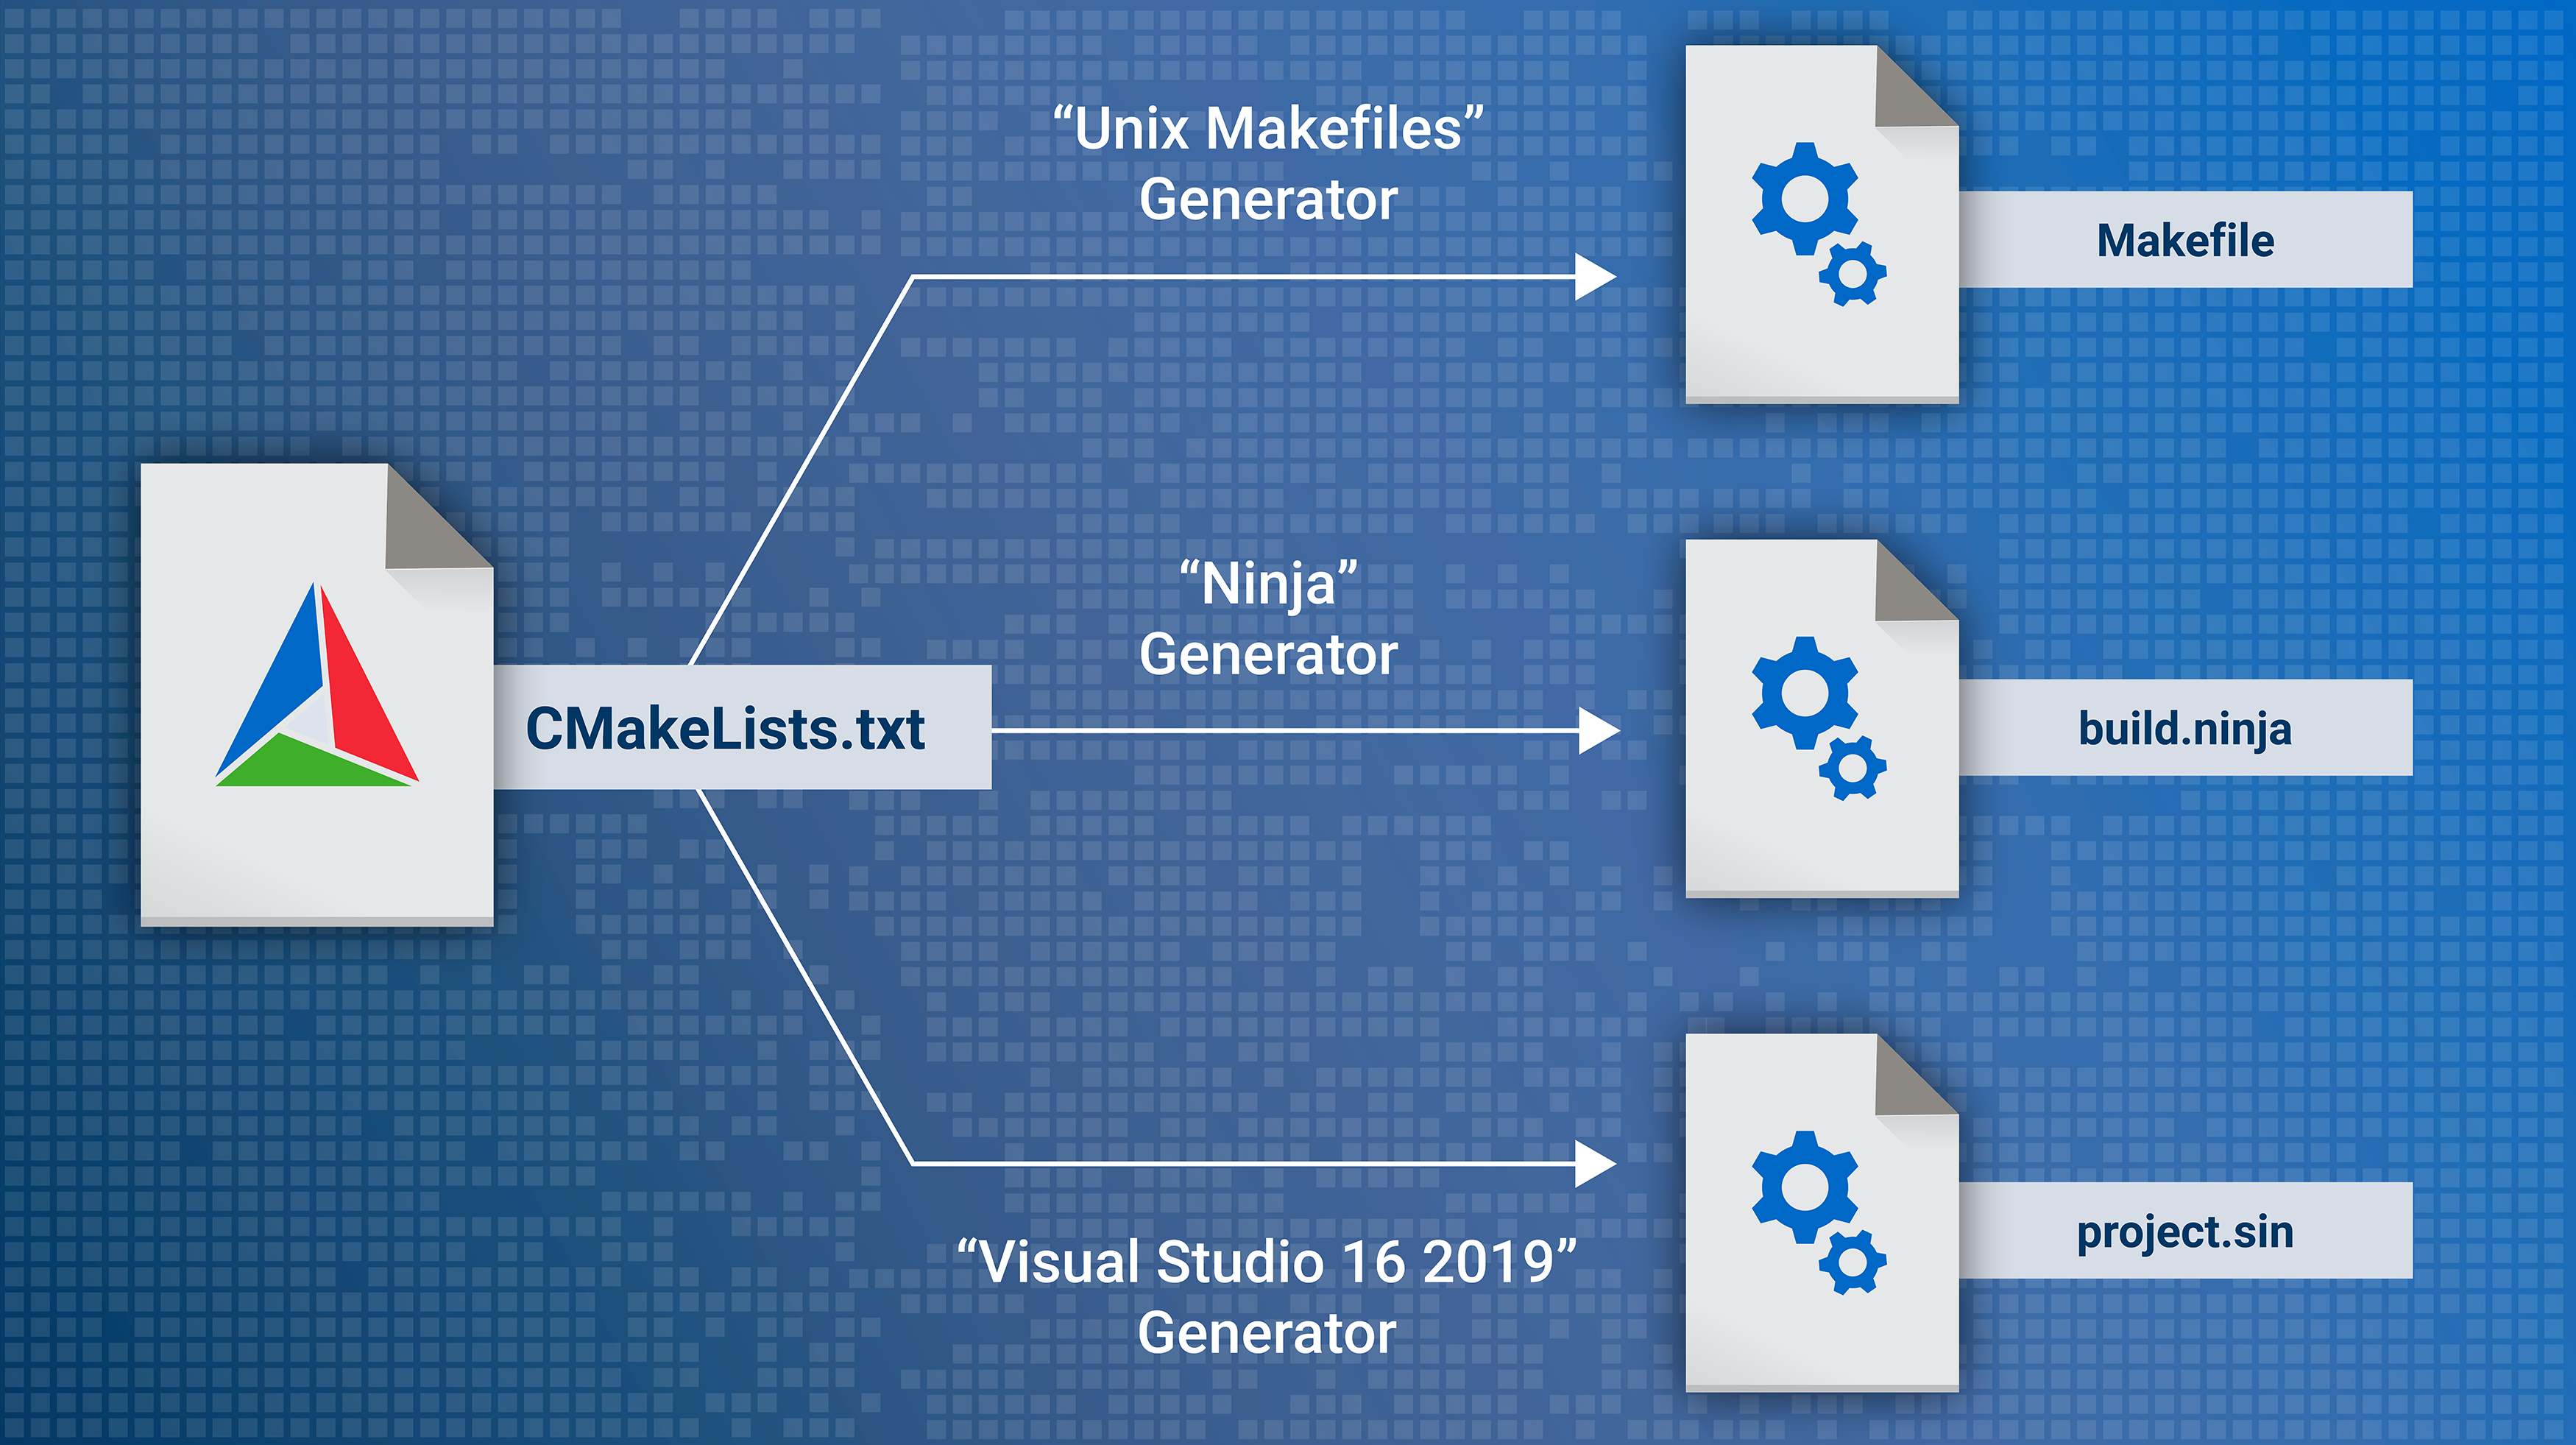
CMake acts as a bridge between developers and the underlying build systems of various operating systems. It translates a project’s source code into a set of instructions that can be understood by the compiler, linker, and other build tools. This translation process, known as "configuration," allows CMake to automatically handle the complexities of cross-platform development, ensuring consistent builds across different operating systems.
The Benefits of Utilizing CMake
-
Cross-Platform Compatibility: CMake’s primary strength lies in its ability to generate build files for various platforms, including Windows, macOS, Linux, and Unix-like systems. This eliminates the need for developers to write platform-specific build scripts, significantly reducing development time and effort.
-
Simplified Build Process: CMake streamlines the build process by automating the creation of build files and managing dependencies. It automatically identifies the necessary libraries, headers, and compiler flags, eliminating the need for manual configuration and reducing the likelihood of errors.
-
Improved Code Portability: By using CMake, developers can ensure their code is easily portable across different platforms. CMake’s configuration process automatically adjusts build settings based on the target platform, ensuring that the code compiles and runs correctly on each system.
-
Enhanced Project Organization: CMake promotes a structured and organized project structure. Its ability to manage dependencies and build targets simplifies project management, allowing developers to easily navigate and maintain large and complex codebases.
-
Extensive Feature Set: CMake offers a wide range of features, including:
- Support for various programming languages, including C, C++, Fortran, Python, and Java.
- Built-in support for popular testing frameworks like Google Test and Catch2.
- Integration with external tools and libraries.
- Advanced build customization options, allowing for fine-grained control over the build process.
Downloading and Installing CMake
-
Visit the Official CMake Website: The first step is to navigate to the official CMake website at https://cmake.org/.
-
Choose the Appropriate Download: The website provides binaries for various operating systems. Select the version compatible with your system and download the appropriate installer.
-
Run the Installer: Once the download is complete, run the installer and follow the on-screen instructions. CMake will be installed in the default location, typically in the "Program Files" directory on Windows or "/usr/local" on Unix-like systems.
-
Verify Installation: To verify that CMake has been installed correctly, open a terminal or command prompt and type "cmake –version." If the installation was successful, CMake’s version number will be displayed.
Using CMake: A Step-by-Step Guide
-
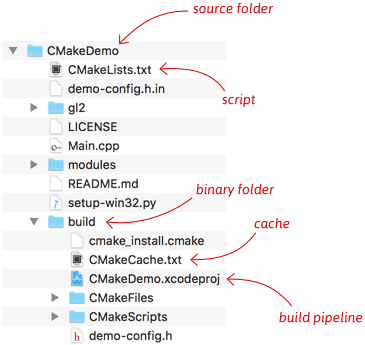
Create a CMakeLists.txt File: The heart of a CMake project is the "CMakeLists.txt" file. This file contains instructions that tell CMake how to build the project. Create a new file named "CMakeLists.txt" in the root directory of your project.
-
Define Project Information: Start by defining the project name and version using the following commands:
cmake_minimum_required(VERSION 3.10)  # Specify the minimum required CMake version
project(MyProject VERSION 1.0.0) # Define the project name and version-
Add Source Files: Specify the source files that need to be compiled. Use the
add_executable()command to create an executable target. For example:
add_executable(my_program main.cpp utility.cpp)-
Specify Dependencies: If your project relies on external libraries, use the
find_package()command to locate and link them. For example:
find_package(OpenCV REQUIRED)
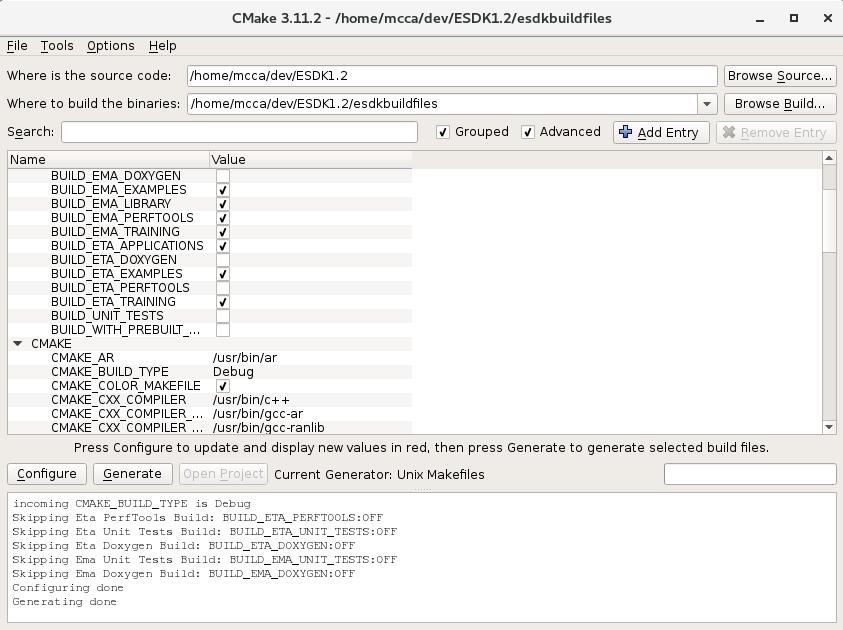
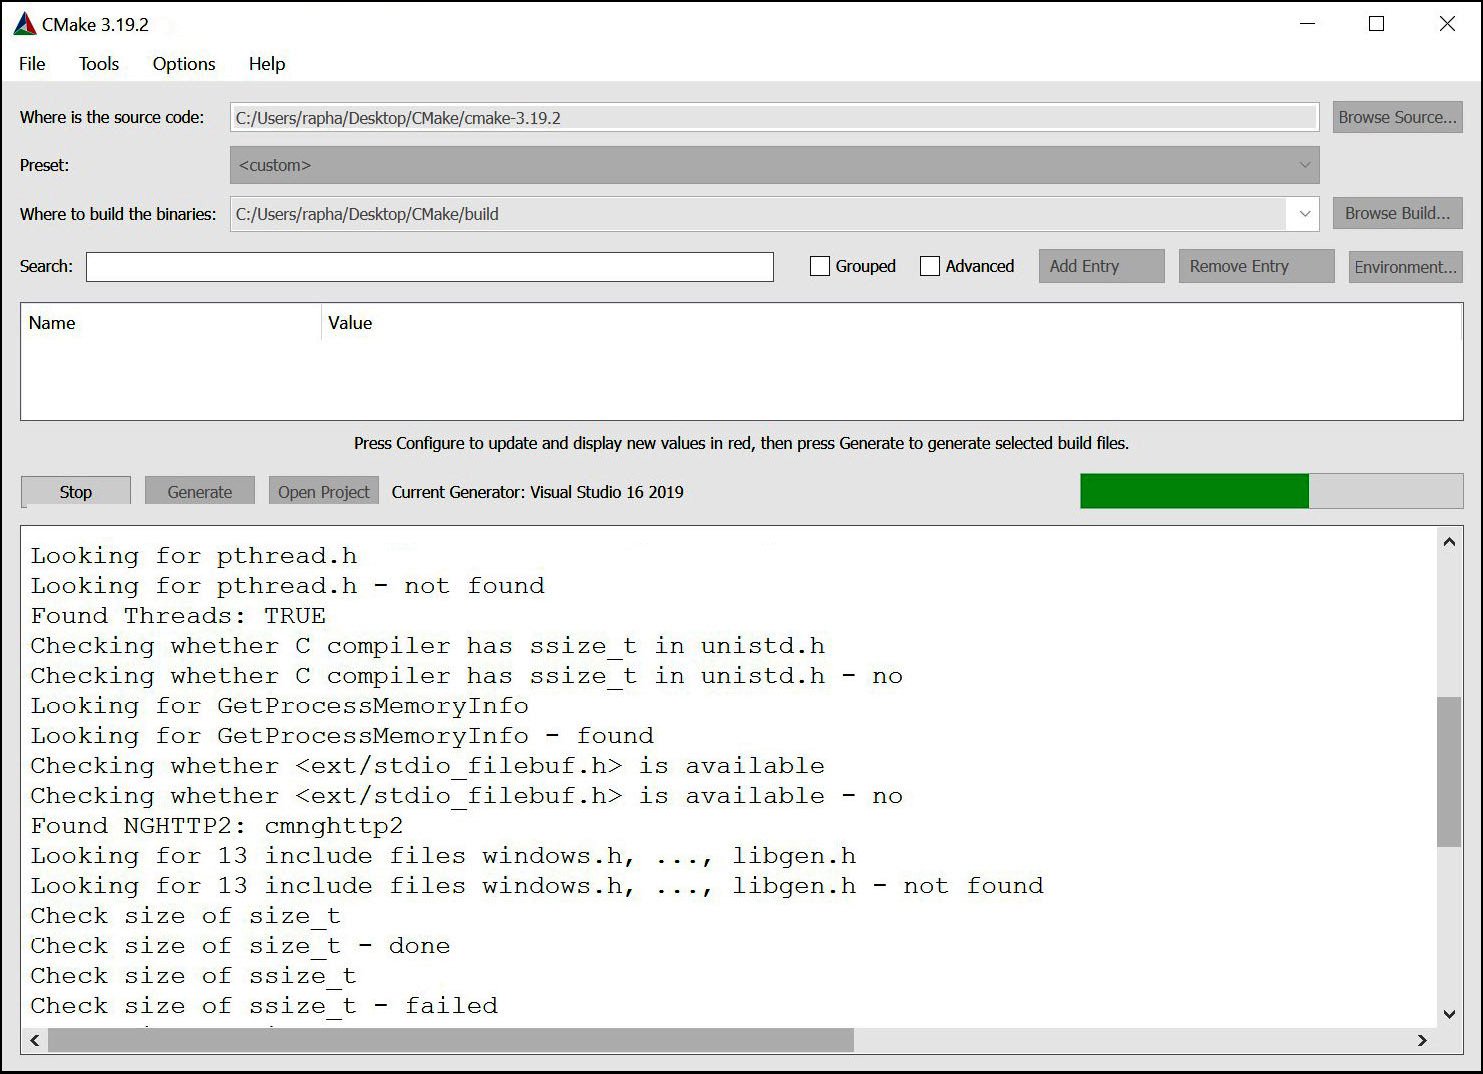
target_link_libraries(my_program OpenCV::opencv_core OpenCV::opencv_highgui)- Generate Build Files: Once the CMakeLists.txt file is complete, use the following command in your terminal to generate build files for your target platform:
cmake .- Build the Project: Navigate to the generated build directory and use the appropriate build command for your platform. For example, on Unix-like systems:
make- Run the Executable: After the build process is complete, you can run the executable by navigating to the build directory and executing the generated executable file.
Frequently Asked Questions (FAQs)
Q1: What is the difference between CMake and Make?
A: CMake and Make are both build tools, but they serve different purposes. Make is a low-level build tool that directly executes build commands. CMake is a higher-level build system that generates Makefiles or other build files that are then used by Make.
Q2: What are the advantages of using CMake over other build systems like Autotools?
A: CMake offers several advantages over Autotools, including a simpler syntax, better cross-platform support, and easier integration with modern IDEs.
Q3: Can CMake be used to build projects written in languages other than C and C++?
A: Yes, CMake supports a wide range of programming languages, including Fortran, Python, and Java.
Q4: How can I debug a CMake project?
A: Most IDEs provide debugging support for CMake projects. You can also use the CMAKE_EXPORT_COMPILE_COMMANDS option to generate a compile_commands.json file that can be used by tools like clangd for debugging.
Q5: What are some best practices for using CMake?
A: Some best practices for using CMake include:
- Keep your CMakeLists.txt file well-organized and documented.
- Use variables and functions to avoid code repetition.
- Use the
find_package()command to locate external dependencies. - Test your build process thoroughly across different platforms.
Tips for Effective CMake Usage
-
Modularize Your CMakeLists.txt: Divide your CMakeLists.txt file into smaller modules for better organization and maintainability.
-
Use External Modules: Take advantage of CMake’s external module system to manage dependencies and simplify project setup.
-
Implement Unit Testing: Utilize CMake’s support for testing frameworks to ensure code quality and stability.
-
Leverage the
cmake_minimum_required()Command: Specify the minimum required CMake version to ensure compatibility and avoid unexpected behavior. -
Utilize Documentation: Refer to the official CMake documentation for comprehensive information on available commands, functions, and best practices.
Conclusion
CMake has revolutionized the software development process by simplifying cross-platform builds and promoting code portability. Its intuitive syntax, extensive feature set, and robust community support have made it the preferred build system for a wide range of projects. By understanding the fundamentals of downloading, installing, and utilizing CMake, developers can streamline their build processes, enhance code quality, and accelerate their development efforts. As the software landscape continues to evolve, CMake remains a vital tool for developers seeking to build robust, scalable, and cross-platform applications.

Closure
Thus, we hope this article has provided valuable insights into A Comprehensive Guide to CMake: Downloading, Using, and Mastering the Build System. We thank you for taking the time to read this article. See you in our next article!