Mastering OpenCV on Ubuntu with CMake: A Comprehensive Guide
Related Articles: Mastering OpenCV on Ubuntu with CMake: A Comprehensive Guide
Introduction
In this auspicious occasion, we are delighted to delve into the intriguing topic related to Mastering OpenCV on Ubuntu with CMake: A Comprehensive Guide. Let’s weave interesting information and offer fresh perspectives to the readers.
Table of Content
- 1 Related Articles: Mastering OpenCV on Ubuntu with CMake: A Comprehensive Guide
- 2 Introduction
- 3 Mastering OpenCV on Ubuntu with CMake: A Comprehensive Guide
- 3.1 Understanding CMake and Its Role in OpenCV Development
- 3.2 Installing OpenCV and CMake on Ubuntu
- 3.3 Building OpenCV Projects with CMake
- 3.4 Advanced CMake Techniques for OpenCV Projects
- 3.5 FAQs Regarding CMake and OpenCV on Ubuntu
- 3.6 Tips for Effective CMake and OpenCV Development
- 3.7 Conclusion
- 4 Closure
Mastering OpenCV on Ubuntu with CMake: A Comprehensive Guide

OpenCV (Open Source Computer Vision Library) is a powerful toolkit for computer vision applications, offering a vast array of functions for image and video processing, object detection, face recognition, and more. Ubuntu, a popular Linux distribution, provides a robust environment for developing and deploying OpenCV projects. CMake, a cross-platform build system, simplifies the process of compiling and managing OpenCV projects, making it an essential tool for developers. This guide explores the intricate relationship between CMake, OpenCV, and Ubuntu, offering a comprehensive understanding of their integration and the benefits it brings.
Understanding CMake and Its Role in OpenCV Development
CMake, short for "Cross Platform Make," is a meta-build system that acts as an intermediary between your source code and the native build tools on your system. It reads a configuration file, typically named CMakeLists.txt, to generate build files specific to your chosen compiler and operating system. This approach offers several advantages:
- Platform Independence: CMake allows you to build your project on various platforms (Windows, macOS, Linux) without modifying your source code. It automatically adapts to the target platform’s build system and compiler.
- Project Organization: CMake facilitates the organization of large projects by providing mechanisms for managing dependencies, defining build targets, and setting compiler flags.
- Dependency Management: CMake simplifies the inclusion and management of external libraries, like OpenCV, by automatically finding and linking them during the build process.
Installing OpenCV and CMake on Ubuntu
Before diving into the intricacies of CMake and OpenCV, it’s crucial to have them installed on your Ubuntu system. The following steps guide you through the installation process:
1. Install Dependencies:
OpenCV relies on several essential libraries. Install them using the following command in your terminal:
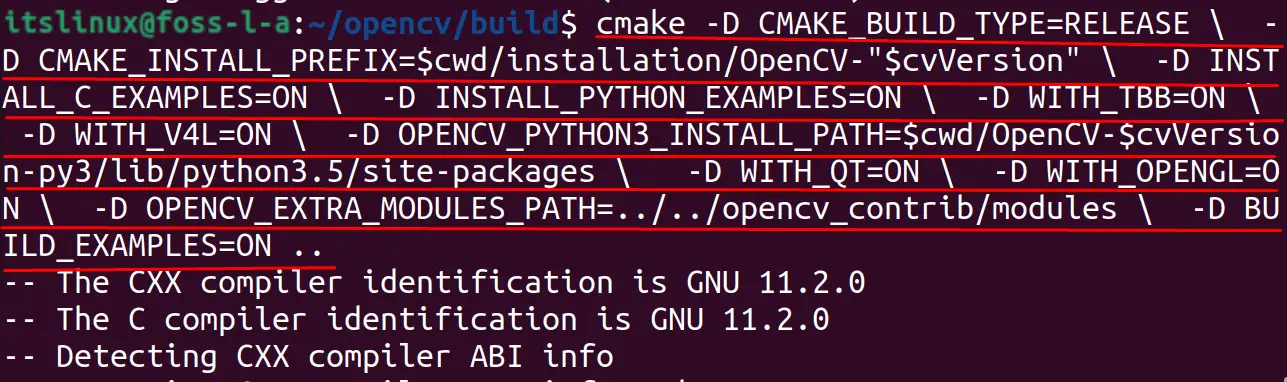
sudo apt-get update && sudo apt-get install build-essential cmake pkg-config libgtk2.0-dev libavcodec-dev libavformat-dev libswscale-dev libjpeg-dev libtiff5-dev libjasper-dev libpng-dev libgstreamer1.0-dev libgstreamer-plugins-base1.0-dev libxine2-dev libv4l-dev libopenexr-dev libqtgui4-dev2. Install OpenCV:
OpenCV can be installed from the official repositories or downloaded from the website. For a straightforward installation, use the following command:
sudo apt-get install libopencv-dev python3-opencv3. Install CMake:
Install CMake using the following command:
sudo apt-get install cmake4. Verify Installation:
After installation, you can verify that CMake and OpenCV are installed correctly by running the following commands:
cmake --version
pkg-config --modversion opencv
These commands will display the versions of CMake and OpenCV installed on your system, confirming a successful installation.
Building OpenCV Projects with CMake
Once OpenCV and CMake are installed, you can start building your OpenCV projects. This section outlines the essential steps involved in using CMake for OpenCV development.
1. Create a Project Directory:
Start by creating a new directory for your project:
mkdir my_opencv_project
cd my_opencv_project
2. Create CMakeLists.txt:
Within your project directory, create a file named CMakeLists.txt. This file acts as the central configuration file for your project, guiding CMake during the build process. Here’s a basic example:
cmake_minimum_required(VERSION 3.10)
project(my_opencv_project)

find_package(OpenCV REQUIRED)
include_directories($OpenCV_INCLUDE_DIRS)

add_executable(my_opencv_program main.cpp)
target_link_libraries(my_opencv_program $OpenCV_LIBS)
3. Create Source Files:
Create your source code files (e.g., main.cpp) in the project directory.
4. Generate Build Files:
Navigate to the project directory in your terminal and run the following command to generate build files:
cmake .This command will create a new subdirectory named build.
5. Build the Project:
Navigate to the build directory and run the following command to build your project:
make6. Run the Project:
After successful compilation, you can run your project executable:
./my_opencv_programAdvanced CMake Techniques for OpenCV Projects
CMake offers numerous advanced features to streamline your OpenCV development workflow. This section delves into some common techniques:
1. Using External Libraries:
OpenCV relies on other libraries like Qt, GTK, and others. To include these libraries in your project, modify your CMakeLists.txt file as follows:
find_package(Qt5Widgets REQUIRED)
include_directories($Qt5Widgets_INCLUDE_DIRS)
target_link_libraries(my_opencv_program $Qt5Widgets_LIBRARIES)
This example demonstrates how to find and link the Qt5Widgets library.
2. Creating Custom Targets:
CMake allows you to define custom build targets for specific parts of your project. For instance, you can create a target for generating documentation or running tests:
add_custom_target(doc
    COMMAND doxygen Doxyfile
    DEPENDS $CMAKE_CURRENT_SOURCE_DIR/Doxyfile
)
3. Setting Compiler Flags:
CMake enables you to set compiler flags for optimizing your build process or enabling specific features. Use the target_compile_options command to add flags:
target_compile_options(my_opencv_program PRIVATE -g -Wall -Wextra)This example adds debugging symbols, warning flags, and extra warnings to the compilation process.
4. Conditional Compilation:
CMake offers conditional statements to control the build process based on system configurations or user-defined variables. This allows you to adapt your project to different environments:
if(WIN32)
    # Code for Windows platform
else()
    # Code for other platforms
endif()
5. Using CMake Modules:
CMake provides a library of modules that extend its functionality. These modules can simplify common tasks like finding libraries, configuring build options, and generating documentation.
6. Creating a Package:
For distributing your OpenCV project, you can package it using CMake’s install command:
install(TARGETS my_opencv_program DESTINATION bin)
install(FILES my_opencv_program.h DESTINATION include)
This command installs the executable and header files to the specified destinations.
FAQs Regarding CMake and OpenCV on Ubuntu
Q: Why is CMake essential for OpenCV projects?
A: CMake simplifies the build process, allowing you to easily manage dependencies, configure build settings, and generate platform-specific build files. This ensures a smooth and consistent development experience across different environments.
Q: Can I use other build systems with OpenCV?
A: While CMake is widely recommended, you can use other build systems like Make, QMake, or Autotools. However, CMake offers significant advantages in terms of portability, dependency management, and flexibility.
Q: How do I debug OpenCV projects built with CMake?
A: Use your preferred debugger (e.g., gdb) and set breakpoints in your source code. Ensure you have enabled debugging symbols during compilation by using the -g flag.
Q: How do I handle OpenCV’s dynamic libraries?
A: CMake automatically finds and links the necessary OpenCV libraries during the build process. You can also explicitly link specific libraries using the target_link_libraries command.
Q: How do I create a GUI application with OpenCV and Qt?
A: Use the Qt library and its widgets to create graphical user interfaces. In your CMakeLists.txt file, find the Qt library, include its header files, and link it to your executable.
Q: How do I integrate OpenCV with other programming languages?
A: OpenCV provides bindings for languages like Python, Java, and C#. Use the appropriate bindings to interact with OpenCV from your preferred language.
Tips for Effective CMake and OpenCV Development
- Start with a clear project structure: Organize your code files, headers, and resources in a logical manner for easy navigation and maintenance.
-
Write comprehensive
CMakeLists.txtfiles: Use clear and concise syntax to define your project’s dependencies, build targets, and compiler options. - Use CMake’s documentation and tutorials: Refer to the official CMake documentation and tutorials for in-depth information on its features and best practices.
- Utilize CMake modules: Explore the available CMake modules to simplify common tasks and enhance your workflow.
- Test your project regularly: Integrate unit tests and integration tests into your development process to ensure code quality and stability.
- Keep your OpenCV installation up to date: Regularly update your OpenCV installation to benefit from new features and bug fixes.
Conclusion
CMake, OpenCV, and Ubuntu form a powerful trio for developing computer vision applications. By mastering CMake’s functionality and understanding its role in managing OpenCV projects, developers can significantly streamline their workflows, improve code organization, and ensure cross-platform compatibility. The advantages of using CMake for OpenCV development are undeniable, offering a robust foundation for creating complex and innovative computer vision solutions. As you embark on your journey with OpenCV and CMake on Ubuntu, remember to leverage the available resources, embrace best practices, and continuously explore the vast potential of this powerful combination.


Closure
Thus, we hope this article has provided valuable insights into Mastering OpenCV on Ubuntu with CMake: A Comprehensive Guide. We appreciate your attention to our article. See you in our next article!