Mastering the Art of Contour Makeup: A Comprehensive Guide
Related Articles: Mastering the Art of Contour Makeup: A Comprehensive Guide
Introduction
In this auspicious occasion, we are delighted to delve into the intriguing topic related to Mastering the Art of Contour Makeup: A Comprehensive Guide. Let’s weave interesting information and offer fresh perspectives to the readers.
Table of Content
Mastering the Art of Contour Makeup: A Comprehensive Guide
Contour makeup, a technique that utilizes strategically placed shadows and highlights, has revolutionized the world of makeup artistry. It allows individuals to sculpt, define, and enhance facial features, creating a more defined and balanced appearance. This guide provides a comprehensive understanding of contour makeup, covering its fundamentals, techniques, and essential tools.
Understanding the Basics of Contour Makeup
Contour makeup essentially involves creating the illusion of depth and dimension on the face by playing with light and shadow. This is achieved by using two primary tools:
- Contouring Products: These are typically darker shades than the skin tone, used to create shadows and define facial features. They come in various forms, including powders, creams, and sticks.
- Highlighting Products: These are lighter shades than the skin tone, used to brighten and accentuate certain areas of the face. They also come in various forms, including powders, creams, and liquids.
The Science Behind Contouring
The principle behind contouring lies in the way light interacts with different shades. Darker shades absorb light, creating the illusion of shadows and recession. Conversely, lighter shades reflect light, creating the illusion of highlights and protrusion. By applying these principles strategically, one can manipulate the perceived shape and structure of the face.
Essential Tools for Contouring
- Contouring Brushes: These are typically flat, angled, or tapered brushes designed to blend and apply contouring products precisely.
- Blending Sponges: These are soft, porous sponges that help seamlessly blend contour and highlight products for a natural finish.
- Mirrors: A large, well-lit mirror is essential for observing the application process and ensuring symmetry.
The Art of Contouring: Techniques and Tips
1. Selecting the Right Products:
- Skin Tone: Choose contouring and highlighting products that complement your skin tone. For fair skin, opt for cool-toned shades, while warm-toned shades suit darker skin tones.
- Finish: Consider the desired finish. Matte products are ideal for a natural look, while shimmery products can add a touch of radiance.
- Formula: Cream products are best for beginners as they are easier to blend, while powders offer a more long-lasting finish.
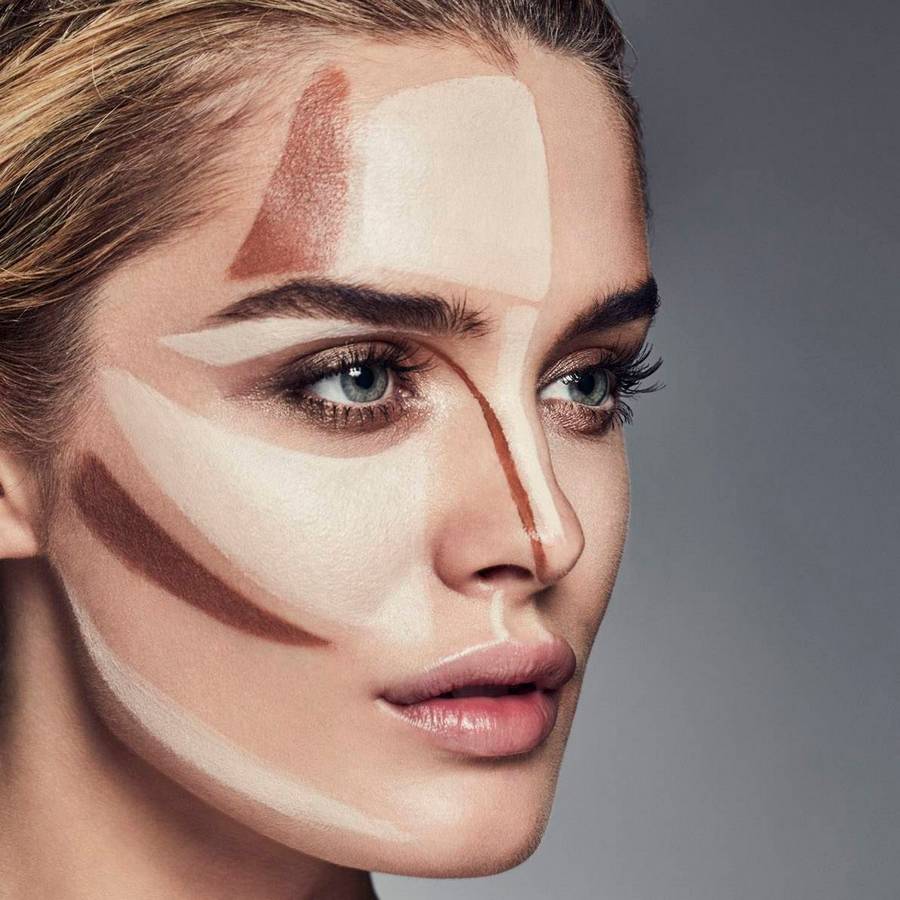
2. Identifying Key Contour and Highlight Zones:
-
Contouring:
- Temples: Apply contour to the temples to create a more defined jawline.
- Cheekbones: Contour the hollows of the cheeks to accentuate their prominence.
- Jawline: Contour the jawline to define its shape and create a more sculpted look.
- Nose: Contour the sides of the nose to narrow its appearance.
- Forehead: Contour the hairline and sides of the forehead to create a more defined shape.
-
Highlighting:
- Brow Bone: Highlight the brow bone to create a lifted and defined look.
- Cupid’s Bow: Highlight the Cupid’s bow to enhance the shape of the lips.
- Center of the Forehead: Highlight the center of the forehead to create a more open and balanced appearance.
- Chin: Highlight the center of the chin to create a more defined and sculpted look.
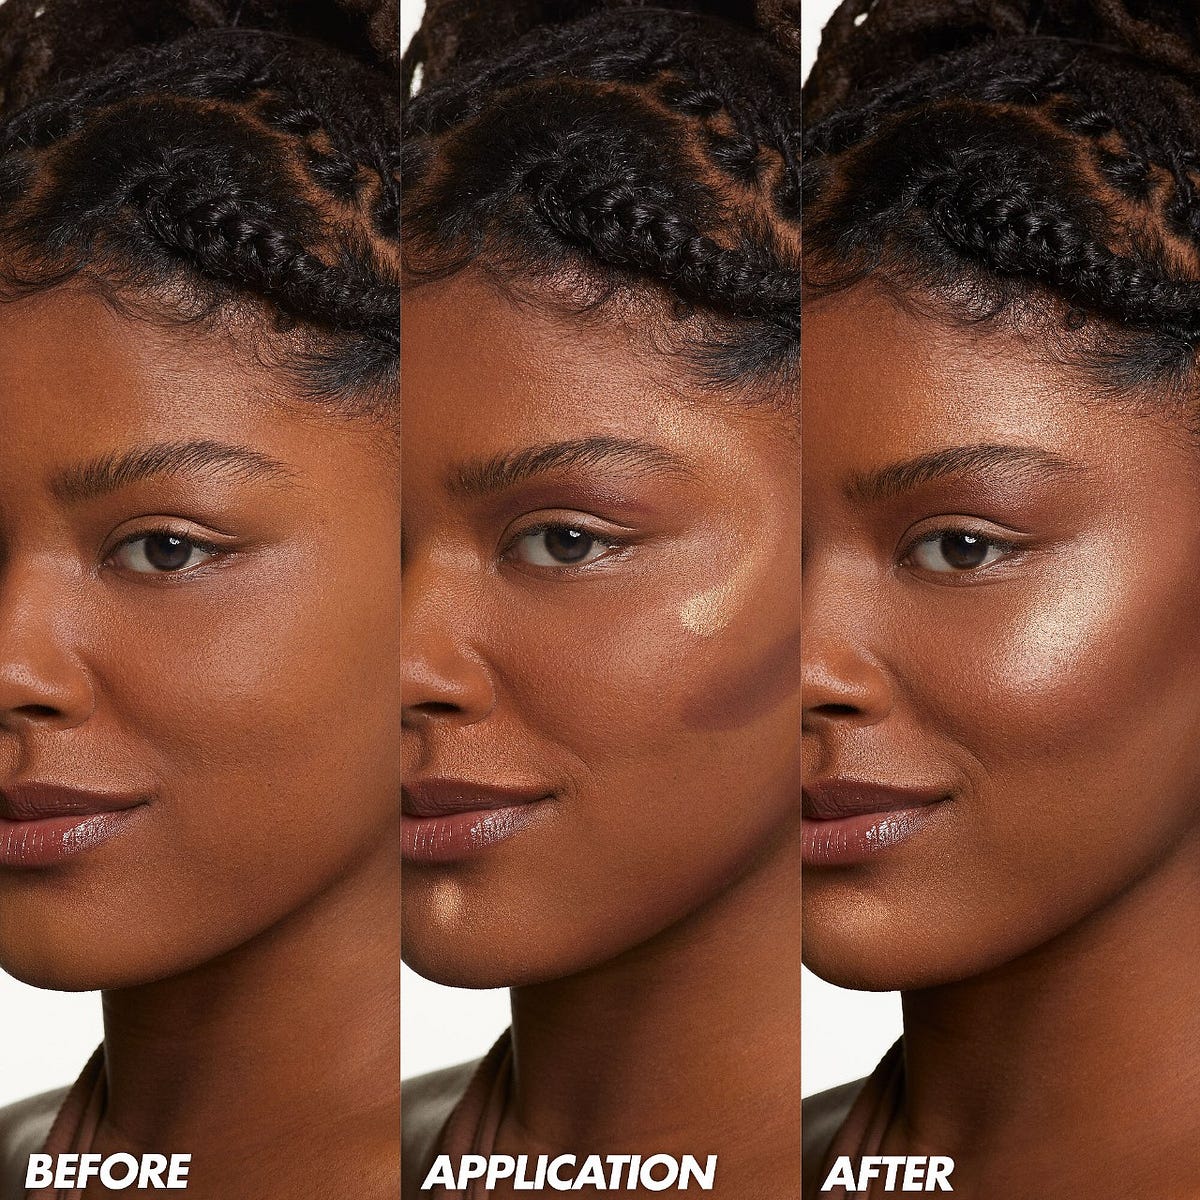
3. Application Techniques:
- Contouring: Use a brush to apply contouring products in thin, feathered strokes, blending them seamlessly into the skin. Focus on areas where you want to create shadows and recession.
- Highlighting: Use a brush or sponge to apply highlighting products to areas you wish to brighten and accentuate. Blend gently for a natural finish.
4. Blending is Key:
- Blending: Blending is the most crucial step in contouring. Use a brush or sponge to gently blend the contour and highlight products, ensuring a seamless transition between shades.
5. Setting with Powder:
- Setting: After blending, set the contour and highlight with a translucent powder to prevent creasing and extend wear.
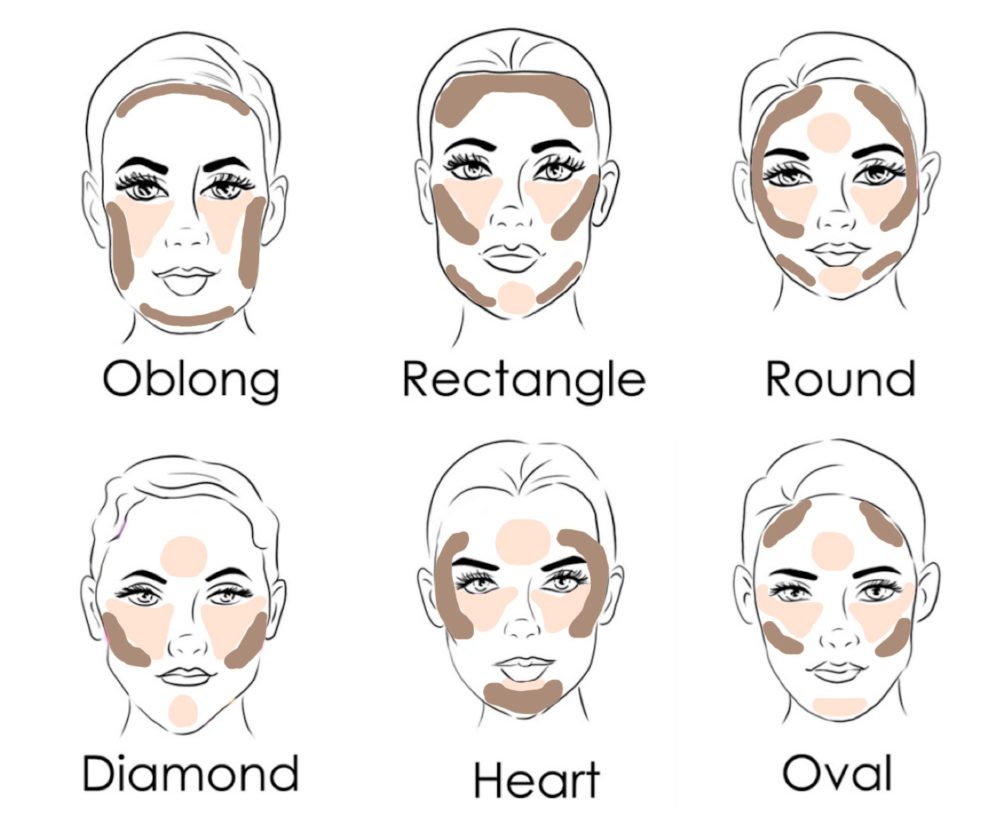
Contouring for Different Face Shapes:
- Round Face: Contour the sides of the forehead and temples to create a more elongated appearance. Highlight the center of the forehead, chin, and cheekbones to accentuate these areas.
- Oval Face: Contour the temples and jawline to create a more defined shape. Highlight the cheekbones and center of the forehead.
- Square Face: Contour the corners of the forehead and jawline to soften the angles. Highlight the center of the forehead, cheekbones, and chin to create a more balanced look.
- Heart Shaped Face: Contour the jawline and temples to create a more balanced appearance. Highlight the center of the forehead, chin, and cheekbones.
- Long Face: Contour the forehead and chin to shorten the appearance of the face. Highlight the cheekbones and center of the forehead.
Contouring for Different Occasions:
- Everyday Look: Use subtle contouring techniques to create a natural, sculpted look.
- Evening Look: Use more dramatic contouring techniques to create a more defined and glamorous look.
FAQs about Contour Makeup
Q: What are the best contouring products for beginners?
A: Cream contour sticks and palettes are generally recommended for beginners due to their ease of blending and application.
Q: How can I choose the right contour shade for my skin tone?
A: The ideal contour shade should be one to two shades darker than your natural skin tone. It should complement your skin undertones, whether warm or cool.
Q: How do I avoid looking muddy or streaky when contouring?
A: Proper blending is key. Use a soft brush or sponge to blend the contour and highlight products seamlessly into the skin. Start with light pressure and gradually build up the intensity.
Q: Is contouring suitable for all skin types?
A: Contouring can be adapted for all skin types. Oily skin may benefit from powder formulas, while dry skin may prefer cream formulas.
Q: How long does contour makeup last?
A: Contour makeup can last for several hours, especially when set with a translucent powder.
Tips for Mastering Contour Makeup
- Start Small: Begin with subtle contouring and gradually increase the intensity as you gain confidence.
- Practice: Regular practice is essential for mastering contouring techniques.
- Use Natural Lighting: Apply contour makeup in natural lighting to ensure accurate color matching.
- Don’t Overdo It: Less is more when it comes to contouring. Aim for a natural and subtle look.
- Experiment: Try different products and techniques to find what works best for you.
Conclusion
Contour makeup is a powerful tool that allows individuals to enhance their natural features and achieve a more defined and balanced look. By understanding the basics of contouring, selecting the right products, and practicing the techniques, anyone can master this art form and create stunning makeup looks. Remember, the key to successful contouring lies in blending, subtlety, and finding the right products and techniques that complement your unique features.


Closure
Thus, we hope this article has provided valuable insights into Mastering the Art of Contour Makeup: A Comprehensive Guide. We appreciate your attention to our article. See you in our next article!