Mastering the Art of Eyeshadow: A Comprehensive Guide to Enhancing Your Look
Related Articles: Mastering the Art of Eyeshadow: A Comprehensive Guide to Enhancing Your Look
Introduction
In this auspicious occasion, we are delighted to delve into the intriguing topic related to Mastering the Art of Eyeshadow: A Comprehensive Guide to Enhancing Your Look. Let’s weave interesting information and offer fresh perspectives to the readers.
Table of Content
- 1 Related Articles: Mastering the Art of Eyeshadow: A Comprehensive Guide to Enhancing Your Look
- 2 Introduction
- 3 Mastering the Art of Eyeshadow: A Comprehensive Guide to Enhancing Your Look
- 3.1 Understanding the Basics: Tools and Techniques
- 3.2 Mastering Color Theory: Creating Harmonious Looks
- 3.3 Enhancing Eye Shape: Tailoring Your Look
- 3.4 Beyond the Basics: Advanced Techniques and Trends
- 3.5 Frequently Asked Questions
- 3.6 Conclusion
- 4 Closure
Mastering the Art of Eyeshadow: A Comprehensive Guide to Enhancing Your Look
Eyeshadow, a versatile and transformative makeup tool, holds the power to elevate your overall look, accentuate your eye shape, and express your personal style. While seemingly simple, applying eyeshadow effectively requires an understanding of techniques, color theory, and the nuances of eye anatomy. This comprehensive guide delves into the intricacies of eyeshadow application, providing valuable insights and tips to help you achieve stunning and professional-looking results.
Understanding the Basics: Tools and Techniques
Before embarking on the journey of eyeshadow application, it is crucial to familiarize yourself with the essential tools and techniques that form the foundation of successful eye makeup.
1. Brushes: The Foundation of Precision
- Blending Brush: A fluffy, dome-shaped brush designed to seamlessly blend eyeshadow colors, creating smooth transitions and eliminating harsh lines.
- Crease Brush: A smaller, tapered brush ideal for defining the crease of the eye and applying darker eyeshadow shades.
- Flat Shader Brush: A dense, flat brush used to pack on color and create a solid base for eyeshadow application.
- Pencil Brush: A small, angled brush perfect for precise application of eyeshadow, particularly along the lash line and in the inner corner of the eye.
- Spoolie Brush: A brush with a spiral brush head used to groom and separate lashes, enhancing the overall look of the eye.
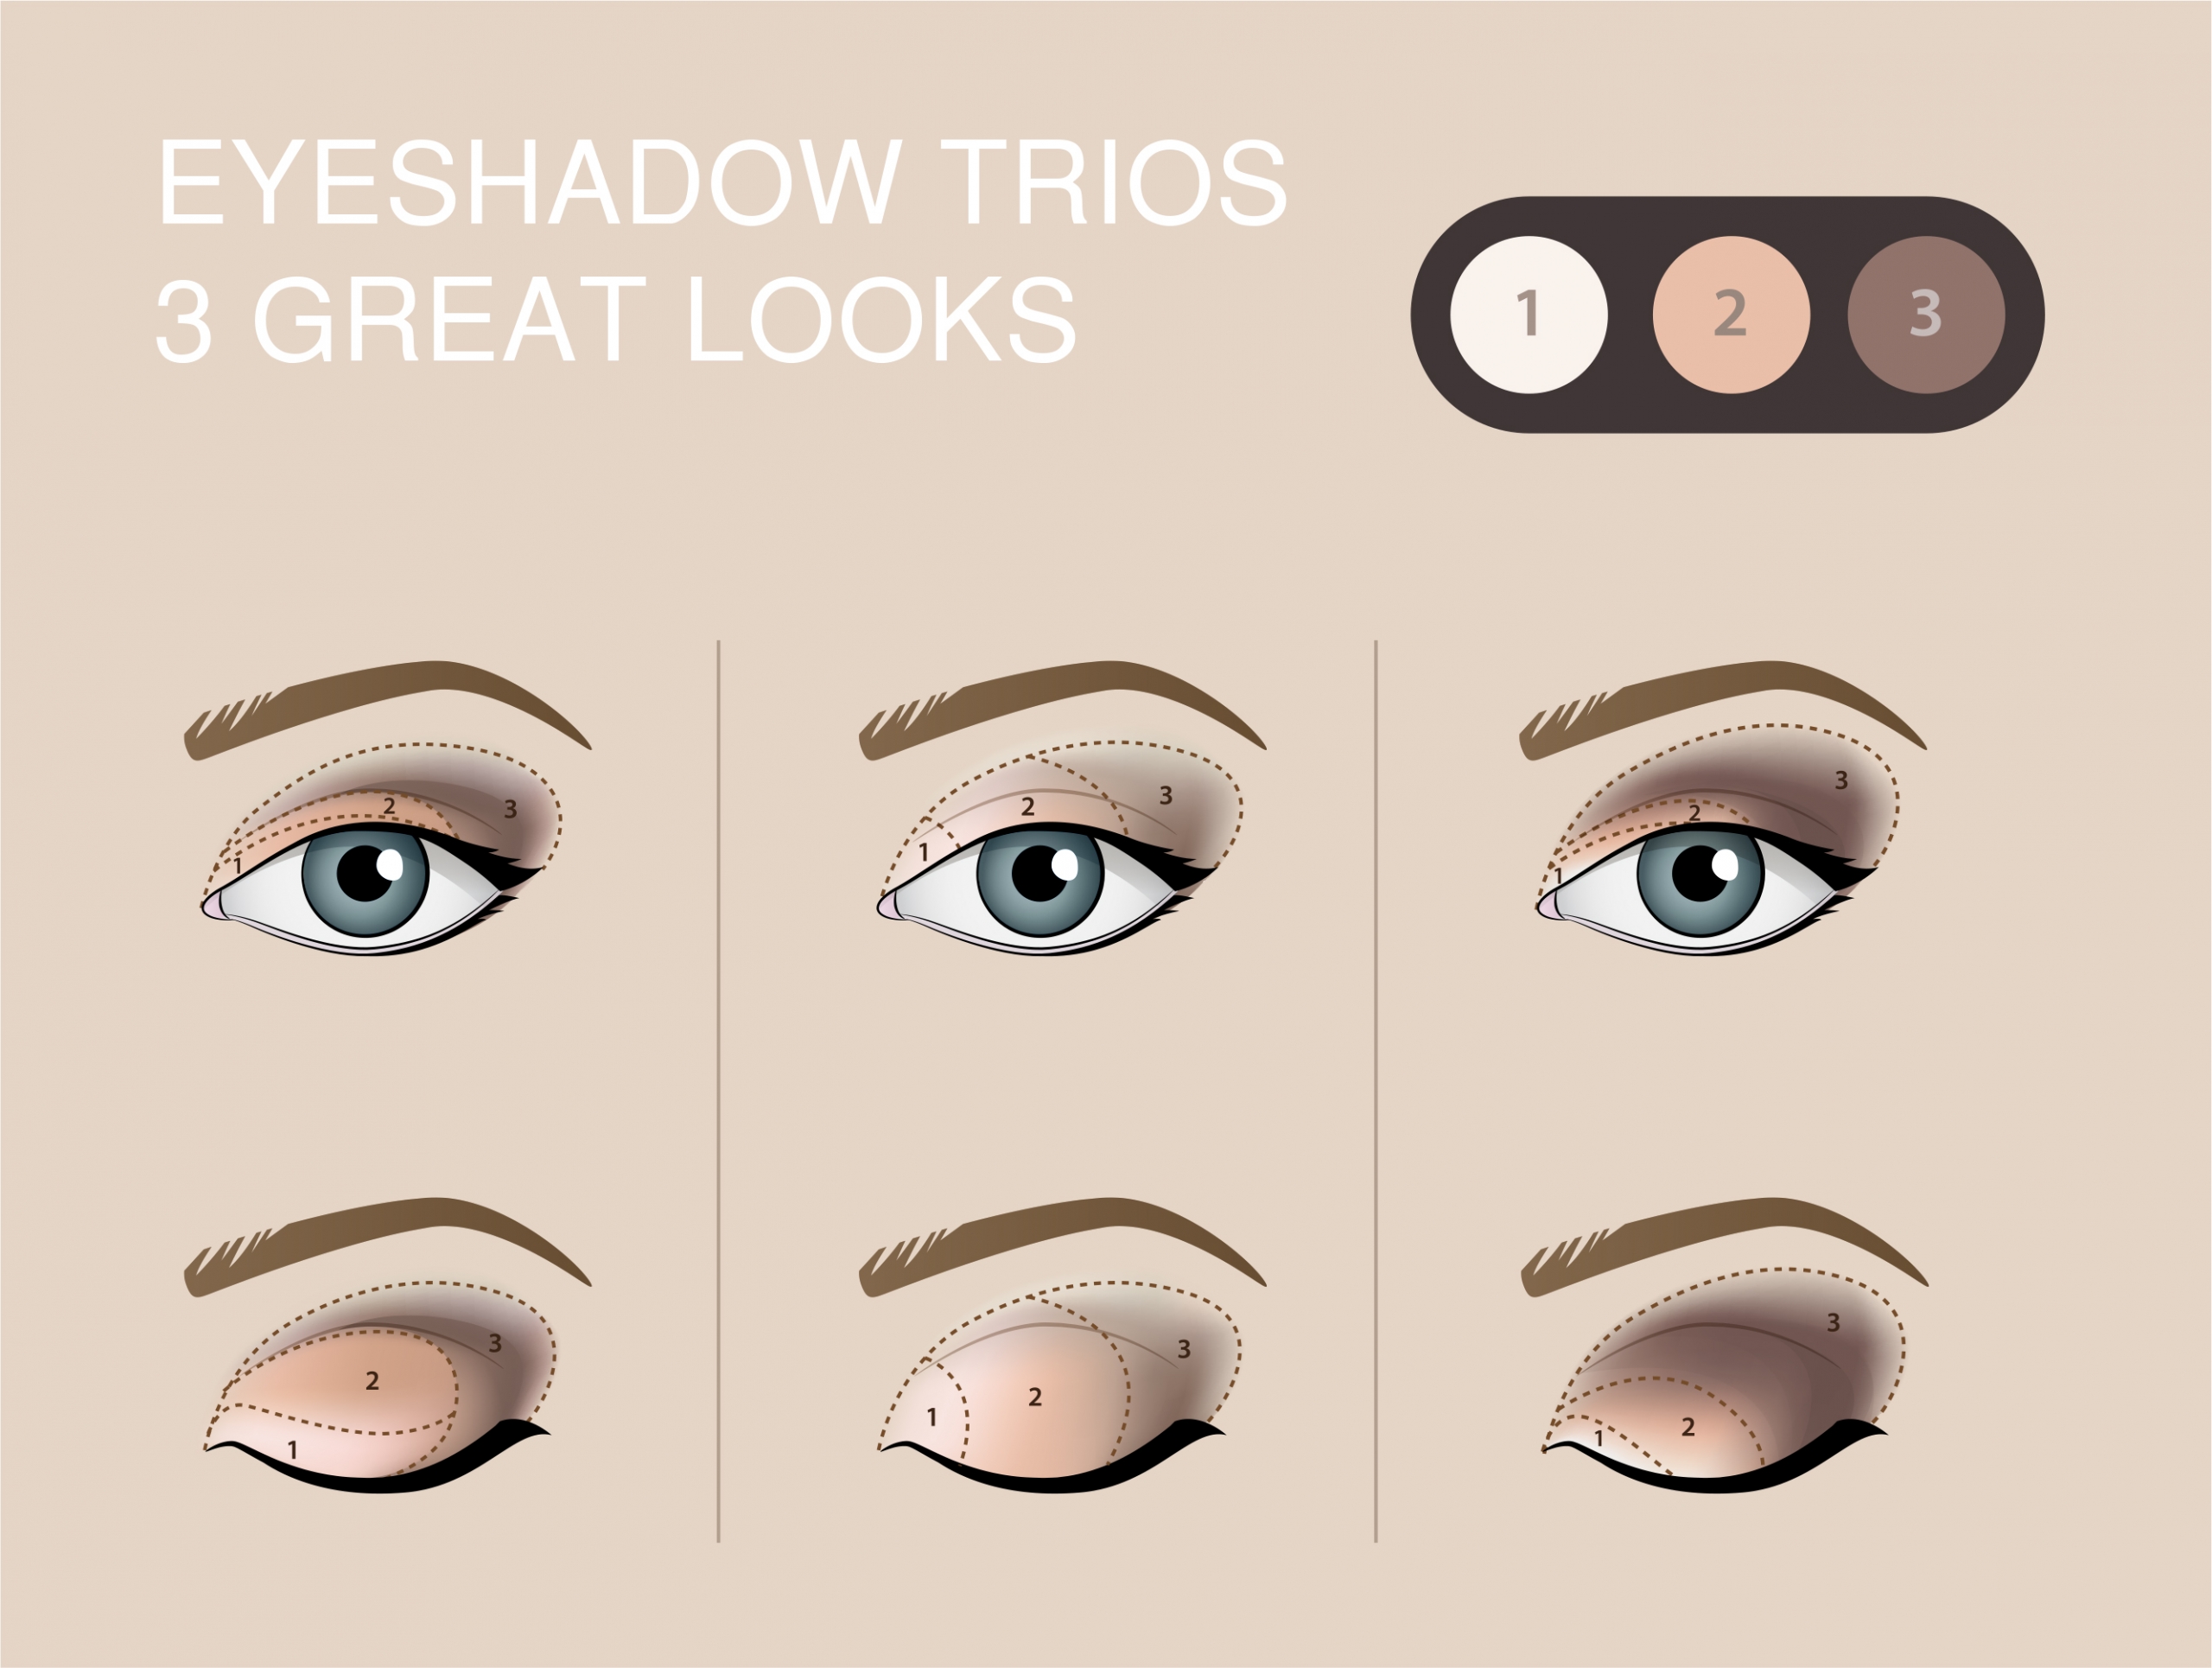
2. Eyeshadow Application: A Step-by-Step Guide
-
Primer: The Key to Longevity
- An eyeshadow primer acts as a smooth canvas, ensuring eyeshadow adheres better and lasts longer.
- Apply a thin layer of primer to the entire eyelid, allowing it to dry before proceeding with eyeshadow.
-
Base Color: Establishing the Foundation
- Select a light, neutral eyeshadow shade, typically in a matte finish, to serve as a base.
- Using a flat shader brush, apply the base color all over the eyelid, from the lash line to the crease.
- This step creates an even foundation and allows for a more vibrant and consistent application of other eyeshadow colors.
-
Crease Color: Defining the Eye Contour
- Choose a darker eyeshadow shade, often in a matte or shimmer finish, to define the crease of the eye.
- Using a crease brush, apply the crease color in a back-and-forth motion, blending it upwards towards the brow bone.
- The crease color creates depth and dimension, enhancing the natural contour of the eye.
-
Lid Color: Adding Vibrancy and Sparkle
- Select a vibrant or shimmery eyeshadow shade to add color and sparkle to the center of the eyelid.
- Using a flat shader brush, apply the lid color from the lash line to the crease, blending it seamlessly with the crease color.
- The lid color is the focal point of the eye makeup, adding a pop of color and enhancing the overall look.
-
Highlight: Accentuating the Brow Bone
- Choose a light, shimmery eyeshadow shade to highlight the brow bone.
- Using a blending brush, apply the highlight shade to the brow bone, blending it gently towards the crease.
- The highlight shade creates a lifted and brightened effect, emphasizing the brow bone and enhancing the overall look.
-
Eyeliner: Defining the Lash Line
- Apply eyeliner along the lash line to create a defined and dramatic look.
- Use a black or brown eyeliner pencil for a softer look or a liquid eyeliner for a more precise and dramatic effect.
- Blend the eyeliner with a small brush for a softer look or leave it sharp for a bolder effect.
-
Mascara: Enhancing Lash Volume and Length
- Apply mascara to the lashes to add volume and length, creating a more defined and dramatic look.
- Choose a volumizing mascara for fuller lashes or a lengthening mascara for longer lashes.
- Apply mascara in an upward and outward motion, starting from the root of the lashes and working towards the tips.
Mastering Color Theory: Creating Harmonious Looks
Color theory plays a vital role in achieving visually appealing and harmonious eyeshadow looks. Understanding the basic principles of color theory can enhance your eyeshadow application skills and allow you to create endless combinations.
1. Color Wheel: A Guide to Complementary and Analogous Colors
- Complementary Colors: Colors opposite each other on the color wheel, such as blue and orange, create high contrast and a dramatic effect.
- Analogous Colors: Colors adjacent to each other on the color wheel, such as blue, blue-green, and green, create a harmonious and subtle look.
2. Warm and Cool Tones: Choosing the Right Palette for Your Skin Tone
- Warm Skin Tones: Individuals with warm skin tones tend to have yellow or golden undertones. They are best suited for eyeshadow shades with warm tones, such as gold, orange, peach, and brown.
- Cool Skin Tones: Individuals with cool skin tones tend to have pink or reddish undertones. They are best suited for eyeshadow shades with cool tones, such as silver, purple, blue, and green.
3. Neutral Colors: Creating a Versatile Base
- Matte Shades: Matte eyeshadows are devoid of shimmer and create a soft, natural look. They are ideal for creating a base, defining the crease, and adding depth to the eye.
- Shimmery Shades: Shimmery eyeshadows contain particles that reflect light, creating a sparkling and luminous effect. They are ideal for adding a touch of glamour to the lid and brow bone.
4. Transition Shades: Creating Smooth Transitions
- Transition shades are neutral eyeshadows that help create smooth transitions between different eyeshadow colors.
- They are typically matte and slightly darker than the base color, allowing for a seamless blending of shades.
Enhancing Eye Shape: Tailoring Your Look
Eyeshadow application can be customized to enhance and accentuate different eye shapes. Understanding the unique characteristics of each eye shape allows you to create looks that flatter and enhance your natural features.
1. Almond Eyes: A Versatile Shape
- Almond eyes are characterized by a slightly elongated shape with a defined crease.
- To enhance almond eyes, focus on defining the crease with a darker eyeshadow shade and applying a lighter shade to the lid.
- Consider using a winged eyeliner to further enhance the almond shape.
2. Hooded Eyes: Maximizing Visibility
- Hooded eyes have a prominent brow bone that covers a portion of the eyelid.
- To maximize visibility, apply eyeshadow shades strategically. Focus on blending eyeshadow colors upwards towards the brow bone, creating a lifted effect.
- Avoid applying heavy eyeshadow to the crease, as it can make the eyes appear smaller.
3. Round Eyes: Creating a More Elongated Look
- Round eyes have a wide and rounded shape.
- To create a more elongated look, focus on defining the outer corners of the eyes.
- Apply a darker eyeshadow shade to the outer corners and blend it upwards towards the crease, creating a more elongated effect.
4. Deep-Set Eyes: Adding Depth and Dimension
- Deep-set eyes have a prominent brow bone and a crease that is further back in the eye socket.
- To add depth and dimension, focus on applying lighter shades to the lid and brow bone, while using darker shades in the crease.
- Avoid using too much eyeshadow in the crease, as it can make the eyes appear sunken.
5. Prominent Eyes: Creating a Softer Look
- Prominent eyes have a more forward-facing appearance.
- To create a softer look, focus on blending eyeshadow shades seamlessly.
- Avoid applying too much eyeshadow to the lid, as it can make the eyes appear even more prominent.
Beyond the Basics: Advanced Techniques and Trends
As you become more comfortable with basic eyeshadow application, explore advanced techniques and trends to elevate your eye makeup game.
1. Cut Crease: A Dramatic and Defined Look
- The cut crease technique involves creating a sharp line between the crease and the lid using a darker eyeshadow shade.
- This technique creates a dramatic and defined look, adding a touch of sophistication to any eyeshadow look.
2. Halo Eyes: A Modern and Luminous Look
- The halo eye technique involves applying a light, shimmery eyeshadow shade to the center of the eyelid, creating a halo effect.
- This technique adds a touch of modern glamour and luminosity to the eyes.
3. Reverse Cut Crease: A Unique and Edgy Look
- The reverse cut crease technique involves applying a darker eyeshadow shade to the lid and a lighter shade to the crease, creating a unique and edgy look.
- This technique is perfect for those who want to experiment with unconventional eyeshadow application.
4. Glitter and Sparkle: Adding a Touch of Glamour
- Glitter and sparkle eyeshadows add a touch of glamour and festivity to any eyeshadow look.
- Apply glitter eyeshadows sparingly to the center of the lid or brow bone, creating a subtle yet impactful effect.
5. Color Blocking: Creating Bold and Geometric Shapes
- Color blocking involves applying bold eyeshadow colors in distinct geometric shapes, creating a modern and artistic look.
- Experiment with different color combinations and shapes to create unique and eye-catching looks.
Frequently Asked Questions
1. What is the best way to clean eyeshadow brushes?
- To clean eyeshadow brushes, use a gentle brush cleaner or a mild soap and warm water.
- Wet the bristles of the brush and apply a small amount of cleaner or soap.
- Gently massage the bristles to remove any eyeshadow residue.
- Rinse the brush thoroughly with water and allow it to air dry completely.
2. How often should I replace my eyeshadow brushes?
- It is recommended to replace eyeshadow brushes every 6-12 months, depending on how frequently they are used.
- If the bristles are worn, frayed, or shedding, it is time to replace the brush.
3. How can I make my eyeshadow last longer?
- Using an eyeshadow primer is the best way to make your eyeshadow last longer.
- Applying a thin layer of primer to the eyelid before applying eyeshadow creates a smooth canvas and helps the eyeshadow adhere better.
4. What are some tips for blending eyeshadow?
- Use a fluffy blending brush to blend eyeshadow colors seamlessly.
- Blend in a back-and-forth motion, starting from the crease and working towards the brow bone.
- Use a light touch and avoid pressing too hard on the eyelid.
5. What are some popular eyeshadow palettes?
- There are many popular eyeshadow palettes available, each with its own unique color story and formula.
- Some popular brands include Anastasia Beverly Hills, Morphe, and Makeup By Mario.
Conclusion
Mastering the art of eyeshadow application requires practice, patience, and a willingness to experiment. By understanding the fundamentals of tools, techniques, color theory, and eye shape, you can create stunning and professional-looking eyeshadow looks. Embrace the versatility of eyeshadow and let it be a canvas for expressing your personal style and enhancing your natural beauty.


Closure
Thus, we hope this article has provided valuable insights into Mastering the Art of Eyeshadow: A Comprehensive Guide to Enhancing Your Look. We thank you for taking the time to read this article. See you in our next article!