The Art of Contour: Before and After Pictures Unveiling the Power of Makeup
Related Articles: The Art of Contour: Before and After Pictures Unveiling the Power of Makeup
Introduction
With great pleasure, we will explore the intriguing topic related to The Art of Contour: Before and After Pictures Unveiling the Power of Makeup. Let’s weave interesting information and offer fresh perspectives to the readers.
Table of Content
The Art of Contour: Before and After Pictures Unveiling the Power of Makeup

Contouring, a makeup technique that utilizes shading and highlighting to sculpt and define facial features, has become a cornerstone of modern beauty routines. While its origins can be traced back to ancient civilizations, its contemporary application is undeniably transformative. The ability to alter the perception of one’s facial structure through strategic application of color is captivating, and before and after pictures serve as powerful visual testaments to its effectiveness.
Understanding the Basics: A Foundation for Transformation
Contouring is based on the principle of light and shadow. Lighter shades, often referred to as "highlights," create a sense of protrusion, drawing attention to desired areas. Conversely, darker shades, known as "contour shades," create the illusion of depth, minimizing or reshaping specific features.
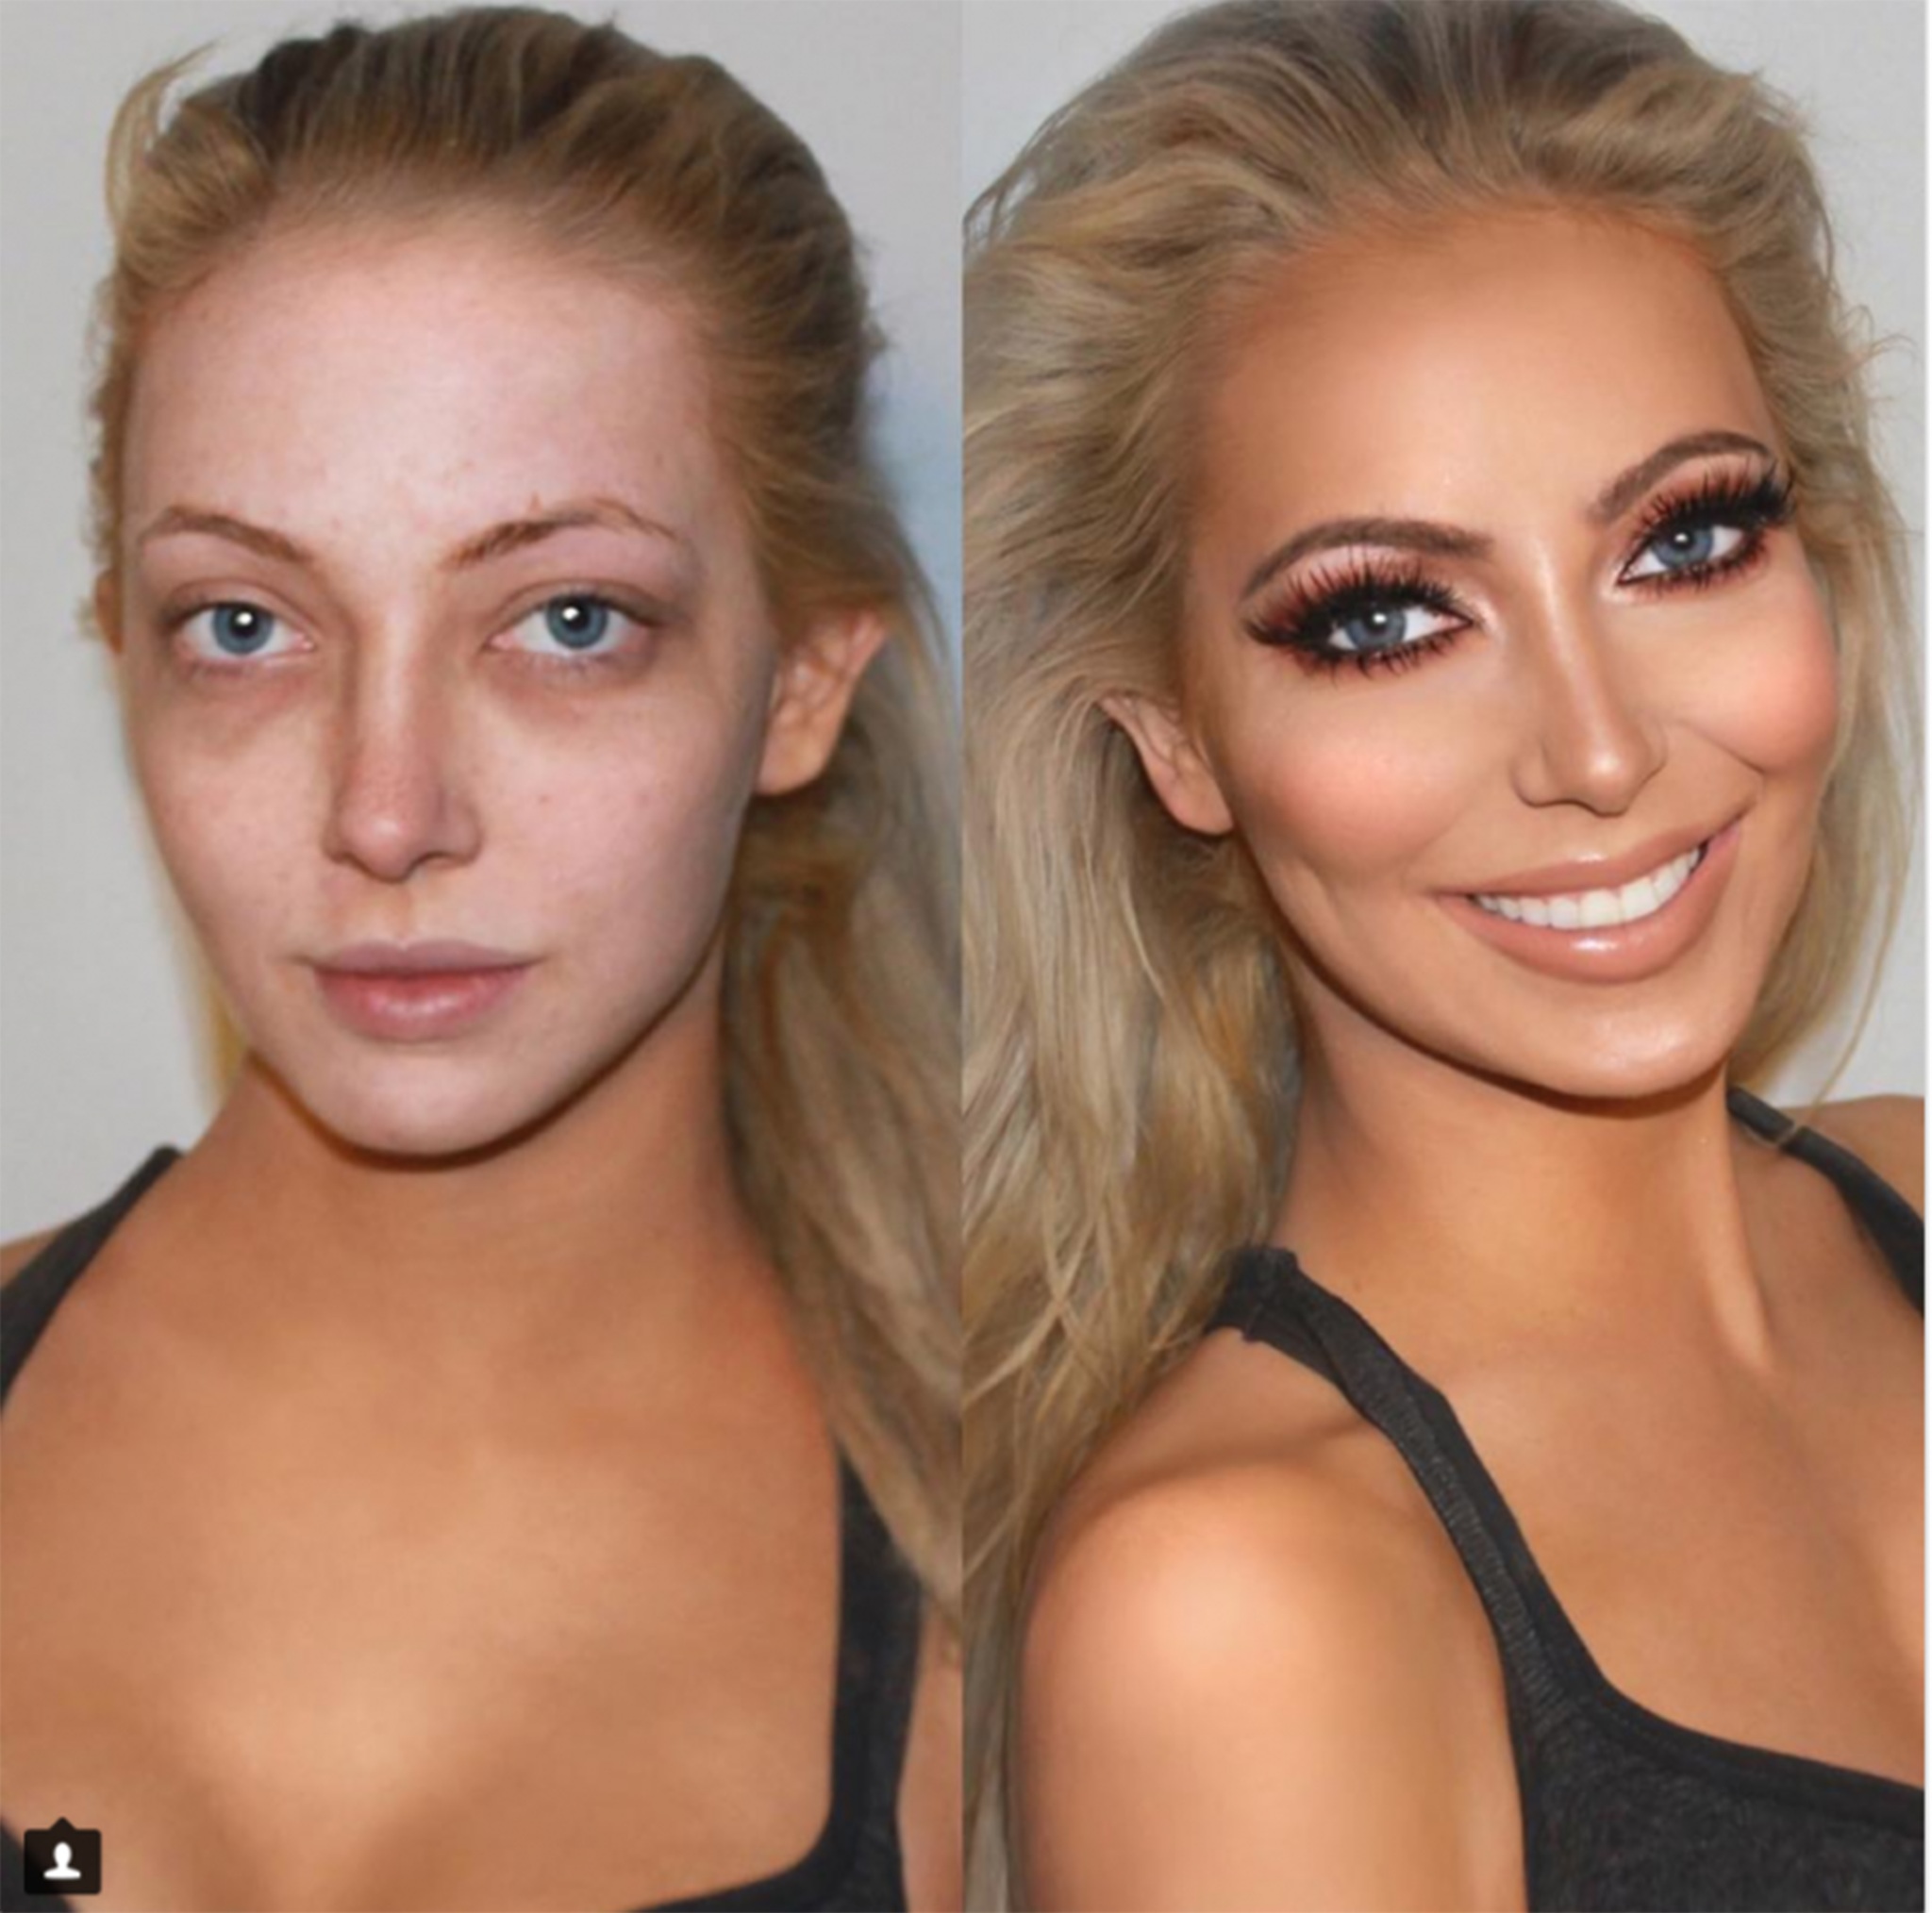
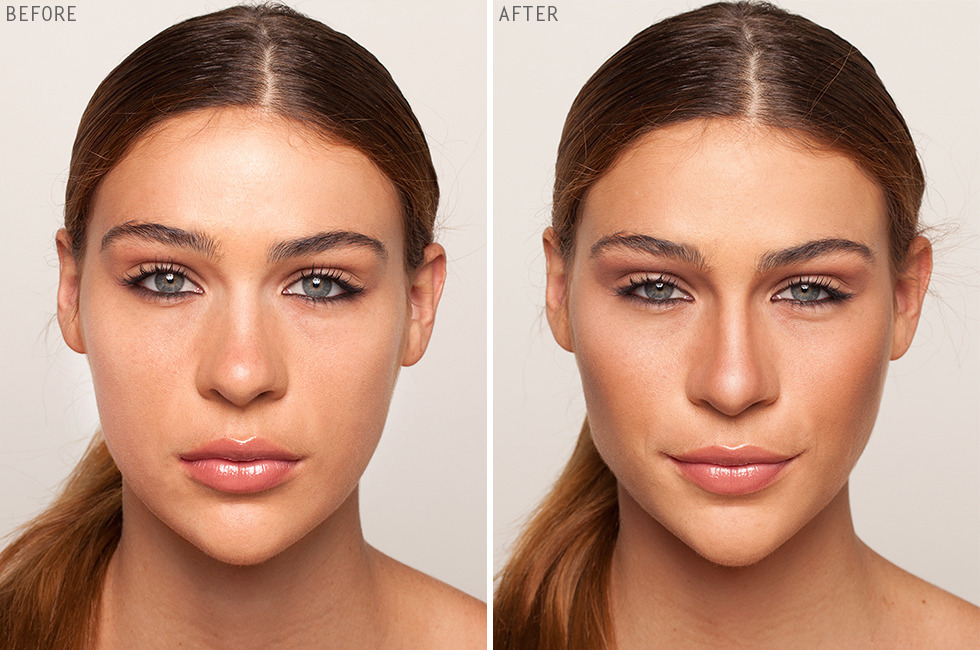
The Role of Before and After Pictures in Contouring
Before and after pictures play a crucial role in demonstrating the transformative power of contouring. They act as visual aids, showcasing the difference between a bare face and one that has been sculpted with strategic shading and highlighting. These images offer a tangible example of how contouring can:
- Enhance Facial Structure: By strategically placing contour and highlight, the appearance of cheekbones, jawlines, and noses can be altered, creating a more defined and sculpted look.
- Minimize Imperfections: Contouring can be used to camouflage minor imperfections like uneven skin tone or a slightly asymmetrical face.
- Create a More Balanced and Harmonious Face: By subtly adjusting the perception of features, contouring can enhance facial harmony and balance.
- Boost Confidence: Seeing the positive effects of contouring through before and after pictures can significantly boost confidence and encourage experimentation with different makeup techniques.
Deconstructing the Transformation: A Detailed Look at Contouring Techniques
Before delving into the specifics of contouring, it is important to understand the fundamental principles that govern its application:
- Color Theory: The success of contouring relies on the contrast between light and dark shades. Choosing colors that complement your skin tone is crucial for achieving a natural and harmonious look.
- Shape and Structure: The placement of contour and highlight is key to shaping and defining features. Understanding the anatomy of the face, particularly the bone structure, is essential for achieving desired results.
- Blending Techniques: Blending is arguably the most crucial step in contouring. It ensures a seamless transition between shades, preventing harsh lines and unnatural-looking results.
Contouring Techniques: A Visual Guide to Shaping and Defining
Let’s delve into specific contouring techniques, illustrated through before and after pictures, to understand their application and impact:
1. Enhancing Cheekbones:
- Before: The cheekbones appear flat or undefined.
- After: Contour is applied along the hollows of the cheeks, creating a shadow that emphasizes the cheekbones. Highlight is placed on the tops of the cheekbones, creating a sense of protrusion. This creates a sculpted and lifted effect.
2. Defining the Jawline:
- Before: The jawline appears soft or undefined.
- After: Contour is applied along the jawline, creating a shadow that defines its shape. This creates a more sculpted and angular appearance.
3. Shaping the Nose:
- Before: The nose appears wide or flat.
- After: Contour is applied down the sides of the nose, creating a shadow that makes it appear narrower. Highlight is placed down the center of the nose, creating a sense of length and definition.
4. Lifting the Eyes:
- Before: The eyes appear tired or sunken.
- After: Highlight is applied to the brow bone and inner corners of the eyes, creating a sense of brightness and lift. Contour is applied in the crease of the eyelid, adding depth and definition.
5. Refining the Forehead:
- Before: The forehead appears large or flat.
- After: Contour is applied along the hairline, creating a shadow that makes the forehead appear smaller. Highlight is placed down the center of the forehead, creating a sense of lift and dimension.
FAQs: Addressing Common Questions about Contouring
1. What products should I use for contouring?
There are various products available for contouring, including:
- Cream Contour Sticks: These are easy to apply and blend, making them suitable for beginners.
- Powder Contour Palettes: These offer a range of shades for customizable contouring.
- Liquid Contour Drops: These are highly blendable and can be mixed with foundation for a more natural look.
2. How do I choose the right contour shade for my skin tone?
Choose a contour shade that is one to two shades darker than your natural skin tone. For lighter skin tones, opt for cool-toned browns or grays. For medium skin tones, warm-toned browns or taupes work well. For darker skin tones, deeper browns or bronzers are recommended.
3. How do I blend contour properly?
Use a soft, fluffy brush to blend contour seamlessly into the skin. Start with light, circular motions and gradually increase pressure for a more defined look. Be sure to blend the edges of the contour to avoid harsh lines.
4. Can I use contouring for everyday makeup?
Absolutely! Contouring can be incorporated into both everyday and special occasion makeup looks. For a natural everyday look, use light contouring and focus on blending for a subtle effect.
5. What are the best practices for contouring beginners?
- Start with a light hand and gradually build up the intensity of the contour.
- Use a brush with soft bristles for blending.
- Practice on a small area of your face before applying to the entire face.
- Watch tutorials and study before and after pictures to gain inspiration and learn different techniques.
Tips for Mastering the Art of Contouring
- Practice Makes Perfect: Contouring is a skill that takes time and practice to master. Don’t be discouraged if your first attempts aren’t perfect.
- Invest in Quality Tools: High-quality brushes and sponges are essential for achieving a seamless and blended look.
- Experiment with Different Techniques: Explore various contouring techniques and find what works best for your face shape and desired look.
- Pay Attention to Lighting: Natural lighting is best for applying contour, as it allows you to see the true shade of the product.
- Don’t Overdo It: Less is often more when it comes to contouring. Start with a light hand and gradually build up the intensity as needed.
Conclusion: Unleashing the Power of Contouring
Contouring is a versatile makeup technique that can enhance facial features, minimize imperfections, and boost confidence. Before and after pictures serve as powerful visual aids, demonstrating the transformative power of this technique. By understanding the principles of light and shadow, choosing the right products, and practicing proper blending techniques, anyone can master the art of contouring and unlock their full beauty potential. Remember, contouring is a journey, not a destination. Embrace the process of experimentation and discovery, and let the power of contouring enhance your natural beauty.


Closure
Thus, we hope this article has provided valuable insights into The Art of Contour: Before and After Pictures Unveiling the Power of Makeup. We appreciate your attention to our article. See you in our next article!